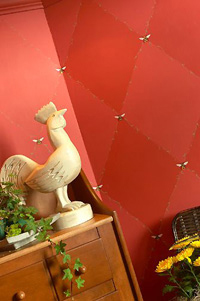
-
Paint base coat. Let dry for 48 hours.
-
Determine the size you want your diamonds to be.
-
Pick the least visible corner in the room for your starting position.
-
Measure and mark off the tip of each diamond.
-
Drop the chalk line from each tip to the floor. Snap the chalk line to make a mark. Do this all around the room.
-
Measure the length of each diamond. Mark this point off in each of the four corners of the room. Then run the plumb line horizontally to line up with these marks. Snap the chalk line.
-
At the tip of the wall, position the chalk line at each diamond tip and run it diagonally across the wall so that it neatly intersects on the diagonal every vertical  and horizontal meeting point. Snap the chalk line to leave a marked line. When you have finished the entire room, you should have a room full of diamonds with a background grid of vertical and horizontal lines.
-
Tape off every second horizontal row of diamonds (outline only).

-
Roll on the darker colour mixed with 1 part paint, 1 part glaze in alternating diamonds.
-
Remove tape immediately and clean up lines if necessary. Let dry 48 hours.
-
Stencil on bee (stencil from Sharon Simms collection) or any motif desired.
-
Optional: Freehand an ivy design along edge of diamond for a softer look.
Paint & Tools:
Base Coat: 3D3-7
Top Coat: 3D3-7(double formula)
Tools:
Tape1670-784,Chalk Line1019-150,Measuring Tape1048-342,
Exacto Knife1034-213, Roller Kit 9"1656-504, Beauti-Tone
Latex Glaze1824-280/299, Small amounts of yellow, black and moss green paint